Whenever I add a network printer to one of my Windows computers at home I end up with a reference to a hard-coded IP address. That means that the next time my home router reboots and assigns a different IP address, I lose the ability to print. Having the printer configured to a hard-coded IP address is like browsing to 74.125.25.105 instead of www.google.com.
In order to ensure reliable printing for my family I have had to do some printer configuration jujitsu and I want to share my steps here, if only so that I’ll remember them next time.
The basic trick is to find the name of the printer and then change the printer configuration to reference the name instead of the IP address. I don’t know why Windows doesn’t do this by default – this problem has existed for many years, with many printers.
All of these steps were done on Windows 7 with a Brother MFC-7820N printer, but I’ve done similar steps with other printers.
Finding the current port
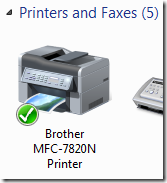
Going to Devices and Printers I found my newly added printer, looking something like the image below:
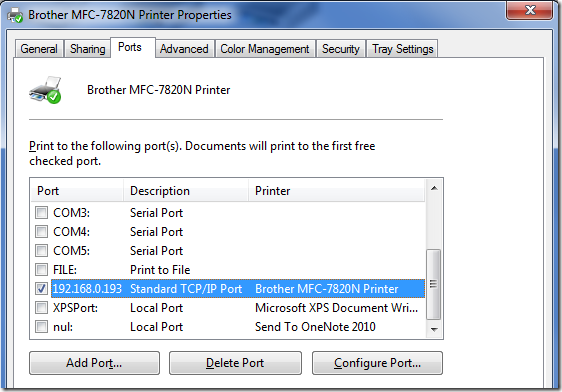
Right clicking on it I selected Printer Properties (not Properties) and navigated to the Ports tab, which looks like this:
You may also be able to get to this dialog by double-clicking the printer and then double-clicking Customize your printer. Poke around until you find it.
If your computer has some printer history then there may be many TCP/IP ports. Pay close attention to which one is selected for your printer because clicking anywhere in the list will change the selected port.
In this case my printer is associated with TCP/IP port number 192.168.0.193 rather than a name and I need to fix this in order to keep it working. The next step is to figure out the printer name. There are a couple of ways of doing this. For both of these techniques you should probably make sure that the printer is on, in case it needs to respond.
Browsing to your printer
If you type your printer’s IP address into your web browser’s address bar then you may get taken to a web page served up by your printer, such as this:
This page may give you a way to find the printer’s name. For this particular printer if you click on Network Configuration, and type in the username and password (admin and access if you haven’t changed them), then you will see a page that includes the Node Name – the printer’s network name:
In this case BRN_88AA08 is the printer’s name.
IP to name through the command line
If browsing to your printer doesn’t work or if you prefer using the command line then there is an alternative. Open up a command prompt and type:
nbtstat -a 192.168.0.193
Replace the IP address with whatever your printer’s IP address is and you should see results that look something like this:
Wireless Network Connection:
Node IpAddress: [192.168.0.191] Scope Id: []NetBIOS Remote Machine Name Table
Name Type Status
———————————————
BRN_88AA08 <00> UNIQUE Registered
BRN_88AA08 <20> UNIQUE Registered
This command confirms that the printer’s name is BRN_88AA08. We can confirm this one more time by pinging the printer name and observing that it resolves to the original IP address.
New port
Now we just have to tell Windows to use the printer name instead of the hard-coded IP address. To do that click on Add Port… from the Ports tab of the Printer Properties dialog. Select Standard TCP/IP Port, click New Port… again, then type the printer name into the Printer Name field. The default Port Name should be fine. Then click Next.
Windows will spend a while detecting the port and will then add it to the list.
Finally you will end back at this dialog where you can select your port name, and optionally delete the old (and now unneeded) hard-coded port.
That’s it. Your kids’ homework assignments will now print reliably without requiring emergency tech support calls.
You can do the process slightly faster by using Configure Port… on the original numeric IP address and just changing the Printer Name or IP Address field. This avoids the port detection phase. But, this leaves the port name as the numeric IP address, which seems a bit confusing.
Adding the new port has to be done on every computer that adds the printer, but at least you don’t have to repeat the steps to find the printer name, so the process can go quite quickly. And again, I really don’t understand why Windows doesn’t do this automatically. I know I’m not the only person who has hit this problem.
Update: I just verified that the problem (and solution) are identical in Windows 8.1. No wonder I hate computers.


My solution was to change my router configuration to assign a fixed IP address to the printer.
That works.
The other option is to set the printer itself to have a static IP – like the router based solution, it means you only have to fix it once, instead of once per windows machine.
I’m not sure how. I can tell the printer to have a static IP, but I’m unclear on how it negotiates that with the router.
It does not need to as long as the router’s DHCP IP address range is separate from the static IPs. The router could e.g. use 1-100 for DHCP while 101-255 are for static addresses.
Last address of a subnet is not usable, it’s a broadcast address.
On a related note, a good habit is to use the actual last address for the router (usually 254). Then you can easily tell whether you ran out of addresses just by checking what’s on the network.
The ideal approach IMO is to associate the desired IP to the printer’s MAC address. We call these “DHCP Reservations” although your router might call them static leases, or some other cutesy name.
The benefit is you can still access things by name, since the DHCP usually talks to the DNS. On most home routers, both services are handled by the same daemon anyway (dnsmasq).
Every device on my home network has a DHCP reserved IP address. Client configuration is painless because it’s still DHCP. Issues like this don’t occur because IP addresses never change. Re-configuring a router is annoying but that doesn’t happen very often. Every new device does require router configuration, but it adds a layer of security and I get to name them so I prefer it that way.
It helps that I use Tomato router firmware which makes it really easy to configure this way.
I suspect Windows still uses the IP address because the upside is that you can still print if your DNS or WINS server is unreachable. In business environments, resources like printers are treated like servers and typically given static/reserved IP addresses.
Very good. I had the same job over the holidays and arrived at the same solution after a lot of messing around. I think with this page in front of me and if the printer hadn’t somehow wiped all its network settings, I could have a chance of pulling it off remotely next time.
So either my router setup preserves IP addresses really well, or there’s a reason why my Epson network printer came with some always-on tools in addition to the drivers – at least it seems to work reliably, even if there’s additional clutter in the notification area. Oh, and are there any self respecting devs that *don’t* hate computers? 🙂
Solution is called Static DHCP reserve 🙂 and I recommend Tomato firmware and a router that supports it (http://tomato.groov.pl/?page_id=69)
Take a look at the registry entries for “Standard TCP/IP Ports” and notice that you can specify the IP address, the hostname and/or the MAC address there:
— KMabcdef.REG —
REGEDIT4
; Configure ‘Standard TCP/IP Port’ for ‘Kyocera FS-1300DN’
[HKEY_LOCAL_MACHINE\System\CurrentControlSet\Control\Print\Monitors\Standard TCP/IP Port\Ports\KMABCDEF]
;”Double Spool”=dword:00000000
“HostName”=”KMABCDEF”
“HWAddress”=”00C0EEABCDEF”
“IPAddress”=””
“PortNumber”=dword:0000238c ; 9100
“Protocol”=dword:00000001 ; RAW
;”Queue”=”lp”
“SNMP Community”=”public”
“SNMP Enabled”=dword:00000001
“SNMP Index”=dword:00000001
“Version”=dword:00000001
— EOF —
If you set a value for more than one of these entries be sure that they match, else the SPOOLER will not be able to connect.
Before you setup a network printer create the appropriate *.REG, stop the SPOOLER service, import the *.REG, restart the SPOOLER service and notice your custom printer port to bind your printer driver to.
If I understand correctly, this is basically a way of automating the process that I describe? As in, the values that I was changing are going into the registry so why not change them with a .reg file?
Correct.
As bonus you can use the never changing MAC address instead of the rather volatile IP address or hostname (which 1. can typically be changed in the printer’s configuration, and 2. might not be resolved on the Windows client if the print server does not broadcast it per NetBIOS or register it with the DHCP/DNS server).
Long story short: with only the MAC address you are on the safe side.
Unfortunately this is not exposed in the GUI.-(
I preconfigure the TCP/IP ports for network printers since Windows 2000 this way.
It’s odd you had to do this for a Brother printer. Their setup program is intelligent enough to do this for you, my MFC-7460DN is already using the node name rather than an IP.
Now we just have to tell Windows to use the printer name instead of the hard-coded IP address.
Thank you for the guidance.. It does work.
Hi,
Thanks for sharing this information with us. It is good and really useful. If you are facing issues during printing then visit Brother HL L6200DW Setup to get details about Driver Download, Wireless Setup & Troubleshooting issue resolutions.
It is very useful and it really works if we follow the steps. You can also visit https://printershut.com/ for solving issues related to printer setup